Welcome!

Hi, a big thank you for visiting me today. I love to be creative in my free time. I have started this blog to share my creations with you.

A great variety of hobbies take my fancy, I love papercrafing, knitting, crocheting, baking, photography and making lovely gifts from the heart.

Please, feel free to leave a comment on things that catch your eye. I have at this point chosen to moderate comments. As I do not wish to have any spam comments posted to my blog. So, for all the genuine visitors your comments are warmly appreciated.

WELCOME! Kick off your shoes, grab a cuppa and have a browse around. I hope you enjoy what I have to share with you. Please, come and visit often, 'cause ya never know what ya gunna get!!!

Thanks for popping by and happy creating!
Cheers, Deb

Monday, August 31, 2009

Pretty in Pink....

G'day everyone, Hope you all had a wonderful weekend.  We did, an outing both days.  It was great!  Here is my share today, a pretty card I made for my girlfriend's little girl's second birthday.


I love this teddy bear image, I'm not sure what she is called, but it's a stamp by Print Blocks Australia.  She is lovely to colour.
I created the pink background cardstock myself. I used versamark ink for the small flowers and a white ink for the sweetness.
I just love how this card came together.  Cute, bright and pretty in pink.
Let me know what you think, I would love to have your opinion.
Thanks for popping by and happy creating.
Have a lovely day,
Cheers, Deb

Sunday, August 30, 2009

Aw Shucks.....

G'day everyone, hope you are all having a lovely weekend.  The card I have to share is called a surprise pop-up card.  I found the idea over at Splitcoaststampers website. 
Have I told you that I absolutely love their website.  Well, I do.  If you have time checkout the resources and the galleries.  There are loads of great tips and tutorials and a neverending supply of topclass inspiration.  Love Splitcoast!!!
Now, back to my card, I love this image.  It's a Rubber Stampede stamp called Suzy's Zoo - Aw Shucks.  With his hands in his pockets and that cute little grin, I think he is just right for a little boys card.
Here is a photo of the card 'popped up'.  This style of card is easy to make and my mind is racing with idea's.  Sure there will be more of this style 'popping up' in the future.  Lol. 
Here is a close up of the stamped image, I coloured him using my copics markers.  I love this cute little face. 
Hope you enjoyed your visit today.  Let me know what you think of the card.
Thanks for popping by and happy creating.
Live it, Love it, Enjoy it, that's what life is all about. 
Cheers, Deb

Friday, August 28, 2009

Nappy Card....

Hey Everyone, Thanks for popping by today.  I have a cute card to share with you today.  I got the idea for this card from Dawn, you can check out a great video tutorial for her card here.  
  
I turned Dawn's design upside down, I wanted the card shape to be like a cloth nappy.  I made the embellishment with some white felt and a gold safety pin. 
I added a cute little stamped verse on the inside flap.  I stamped both the front Congratulations and this verse with brown ink.  Then I used a polysparkle embossing powder to give a sparkly, glittery finish.  Love the bling.
And here is the inside.  I printed the verse using the computer, glued it to the white cardstock and inked the edges.  I added a piece of inked cardstock to the lower flap so I had plenty of room to write a greeting.
I hope you enjoyed my card today.  If you have time check out Dawn's blog, she has an amazing collection of tutorial style videos.  She is a great source of inspiration.
Thanks for popping by, happy creating.
Have a lovely day, Deb

Wednesday, August 26, 2009

Here is the real thing.....

When I asked my big boy what he wanted on his birthday cake this year his reply didn't really surprise me.  ''Lighting McQueen and Mater''.  As a mad keen Cars fan every red car is Lighting McQueen and every tow truck is Mater.  Laughing.
So, here is my creation....
The best bit was that my little one loved it!  When we brought it out and lit the candles, all he could say was ''Awwh, look at this!''  Then it was, ''Look there is Lighting McQueen and look there is Mater, they're on the road.''
It made my day that such a simple thing as my cake could make him so happy.  My little darling boy, his big eyes were so full of joy.  Gotta love that boy.

Thanks for popping by, hope you enjoyed what I have shared today.  

Happy creating,
Cheers  Deb

Tuesday, August 25, 2009

Ooooh, Baaabbby.....

Hi everyone,   The next creation I am sharing with you today is a nappy(diaper) cake.  When I found out a girlfriend of mine had had a little boy my mind went into overdrive.  I had been wanting to make up one of these for the longest time, after seeing one done up in a magazine.


Now for those of you who don't know what I'm rambling on about, a nappy cake is made up of that's right nappies! I rolled up 18 nappies to use as the 'cake' base.  I wrapped a soft, cuddly baby blanket around the base. And decorated the top with three pairs of socks, five bibs and a cute teddy comforter toy.
 
I rolled the socks and bibs to look like pretty flowers (roses maybe?) and cut squares of dark green tissue paper to form the leaves.  I left the toy on the card he was purchased on and just pushed it into the edge of the nappies and baby blanket.  I wrapped a piece of light blue cardstock around the outside and finished it off with some twisted raffia. 
A cute 'cake' without the calories.  You can't get much better than that.  Insert chuckling. 
I wrapped the whole cake in clear cellophane wrap.  Then, I made up an ingredients list, that had all bubs birth details and the list of cake ingredients. I stamped up a piece of the blue cardstock and layered the list onto it and then laminated the whole tag.  I thought that once the cake had been used it would make a great keepsake.
Thanks for popping by, hope you found some inspiration to get creative.
See you again soon,
Cheers, Deb

Monday, August 24, 2009

Outside the Box!!!

This is the present I made for Mum for Mother's day. 
I found a heart shaped post-it note block in my local supermarket.  This is the idea that popped into my head when I saw it. 
                                     
                              
I used a heart shaped Fiskars hard plastic template to cut out the hearts for the base and top.  Added the yellow cardstock around the outside of the base and lid.  Then lined the base and lid with the designer paper.


I layered up the flowers and added a loop of ribbon for the pen.  I designed the base to be lower than the post-its so that you can just take the lid off to use it.  As it gets lower you can take it out to use.  When this lot is gone Mum can buy another one to replace it.


Gotta love that thinking, Outside the Box!


Hope you enjoy, leave me a comment.
Thanks for popping by and happy creating!!!


Cheers, Deb

Sunday, August 23, 2009

Here we go!

Wow! Who would have thought that a social stamping outing would lead to this. Not me! It all began about 2 years ago when I first went to a stamping day run by a lovely lady named Cheryll.

Cheryll's patience, kindness and great sense of humour opened up to me this wonderful, addictive craft. When I'm not stamping/cardmaking, I'm thinking about it. Yes, I did say addictive. So, a big thanks goes out to you Cheryll.

I have always loved paper, colour and being creative. B.S.(or Before Stamping) I always enjoyed working with colours by crocheting and knitting, and having two Grandmas and a Mum who were avid bakers also developed a love of cooking. I have started this blog to share some of my creations with you.

So, if you like variety and enjoy a crazy sense of adventure, come back and visit often, because you never know what ya gunna get!

Here we go! What I have to share with you today is a card. Surprise, surprise! I made this card for my Mum for Mother's Day this year. It is called a flower pot pocket card. A tutorial for this card can be found on the Splitcoaststampers website.

I made the pot following the instructions and then stamped the flowery swirls with brown ink and added dots with a white gel pen. Inked the edges with brown and then made up the insert. With the insert in the pot I added the flowers.

The paper flowers were an assortment from my stash. The large yellow flower was originally white, I inked the edges with yellow and pink. I layered the flowers together, I used a daisy paper punch to punch out the centers.
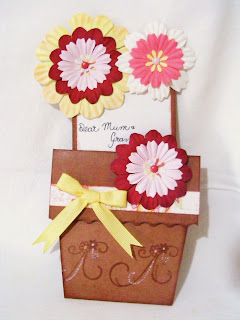
I added two of the flowers to the insert and one onto the pot itself. I then added the strip of designer paper and glued on the yellow ribbon bow.

Mum absolutely loved it! Hope you enjoy the first creation I have shared with you. In my next post I will show you the present I made for Mum to go with her card.

Please feel free to leave comments.

Thanks for popping by and happy creating!!!
Deb